17.2.2.3 Initial Startup of MySQL Cluster on Windows
Mysql Cluster Windows 8
Once the MySQL Cluster executables and needed configuration files are in place, performing an initial start of the cluster is simply a matter of starting the MySQL Cluster executables for all nodes in the cluster. Each cluster node process must be started separately, and on the host computer where it resides. The management node should be started first, followed by the data nodes, and then finally by any SQL nodes.
On the management node host, issue the following command from the command line to start the management node process:
The management node process continues to print logging output to the console. This is normal, because the management node is not running as a Windows service. (If you have used MySQL Cluster on a Unix-like platform such as Linux, you may notice that the management node's default behavior in this regard on Windows is effectively the opposite of its behavior on Unix systems, where it runs by default as a Unix daemon process. This behavior is also true of MySQL Cluster data node processes running on Windows.) For this reason, do not close the window in which ndb_mgmd.exe is running; doing so kills the management node process. (See Section 17.2.2.4, “Installing MySQL Cluster Processes as Windows Services”, where we show how to install and run MySQL Cluster processes as Windows services.)
The required
-foption tells the management node where to find the global configuration file (config.ini). The long form of this option is--config-file.A MySQL Cluster management node caches the configuration data that it reads from
config.ini; once it has created a configuration cache, it ignores theconfig.inifile on subsequent starts unless forced to do otherwise. This means that, if the management node fails to start due to an error in this file, you must make the management node re-readconfig.iniafter you have corrected any errors in it. You can do this by starting ndb_mgmd.exe with the--reloador--initialoption on the command line. Either of these options works to refresh the configuration cache.It is not necessary or advisable to use either of these options in the management node's
my.inifile.For additional information about options which can be used with ndb_mgmd, see Section 17.4.4, “ndb_mgmd — The MySQL Cluster Management Server Daemon”, as well as Section 17.4.26, “Options Common to MySQL Cluster Programs — Options Common to MySQL Cluster Programs”.
On each of the data node hosts, run the command shown here to start the data node processes:
In each case, the first line of output from the data node process should resemble what is shown in the preceding example, and is followed by additional lines of logging output. As with the management node process, this is normal, because the data node is not running as a Windows service. For this reason, do not close the console window in which the data node process is running; doing so kills ndbd.exe. (For more information, see Section 17.2.2.4, “Installing MySQL Cluster Processes as Windows Services”.)
Do not start the SQL node yet; it cannot connect to the cluster until the data nodes have finished starting, which may take some time. Instead, in a new console window on the management node host, start the MySQL Cluster management client ndb_mgm.exe, which should be in
C:mysqlbinon the management node host. (Do not try to re-use the console window where ndb_mgmd.exe is running by typing CTRL+C, as this kills the management node.) The resulting output should look like this:When the prompt
ndb_mgm>appears, this indicates that the management client is ready to receive MySQL Cluster management commands. You can observe the status of the data nodes as they start by enteringALL STATUSat the management client prompt. This command causes a running report of the data nodes's startup sequence, which should look something like this:Commands issued in the management client are not case-sensitive; we use uppercase as the canonical form of these commands, but you are not required to observe this convention when inputting them into the ndb_mgm client. For more information, see Section 17.5.2, “Commands in the MySQL Cluster Management Client”.
The output produced by
ALL STATUSis likely to vary from what is shown here, according to the speed at which the data nodes are able to start, the release version number of the MySQL Cluster software you are using, and other factors. What is significant is that, when you see that both data nodes have started, you are ready to start the SQL node.You can leave ndb_mgm.exe running; it has no negative impact on the performance of the MySQL Cluster, and we use it in the next step to verify that the SQL node is connected to the cluster after you have started it.
On the computer designated as the SQL node host, open a console window and navigate to the directory where you unpacked the MySQL Cluster binaries (if you are following our example, this is
C:mysqlbin).Start the SQL node by invoking mysqld.exe from the command line, as shown here:
The
--consoleoption causes logging information to be written to the console, which can be helpful in the event of problems. (Once you are satisfied that the SQL node is running in a satisfactory manner, you can stop it and restart it out without the--consoleoption, so that logging is performed normally.)In the console window where the management client (ndb_mgm.exe) is running on the management node host, enter the
SHOWcommand, which should produce output similar to what is shown here:You can also verify that the SQL node is connected to the MySQL Cluster in the mysql client (mysql.exe) using the
SHOW ENGINE NDB STATUSstatement.
You should now be ready to work with database objects and data using MySQL Cluster's NDBCLUSTER storage engine. See Section 17.2.5, “MySQL Cluster Example with Tables and Data”, for more information and examples.
Mysql Cluster Installation
Beginning with MySQL Cluster NDB 7.0.16 and MySQL Cluster NDB 7.1.5, you can install ndb_mgmd.exe, ndbd.exe, and ndbmtd.exe as Windows services. For information on how to do this, see Section 17.2.2.4, “Installing MySQL Cluster Processes as Windows Services”).
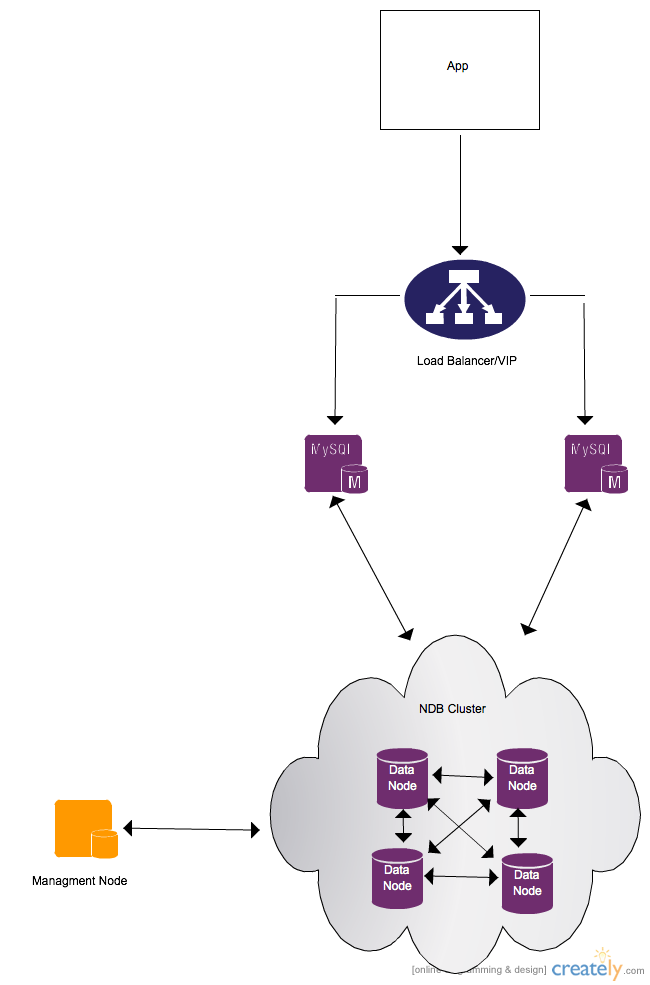
The MySQL Cluster distributed database provides high availability and throughput for your MySQL database management system. A MySQL Cluster consists of one or more management nodes (ndbmgmd) that store the cluster’s configuration and control the data nodes (ndbd), where cluster data is stored. After communicating with the management node, clients (MySQL clients, servers, or native APIs) connect directly to these data nodes. For information about installing NDB Cluster on Windows from a binary release provided by Oracle, see Section 21.2.4.1, “Installing NDB Cluster on Windows from a Binary Release”. It is also possible to compile and install NDB Cluster from source on Windows using Microsoft Visual Studio. For more information, see Section 21.2.4.2, “Compiling and Installing NDB Cluster from Source on Windows”.
On this page
How To Set Up A Load-Balanced MySQL Cluster
Version 1.0
Author: Falko Timme
This tutorial shows how to configure a MySQL 5 cluster with three nodes: two storage nodes and one management node. This cluster is load-balanced by a high-availability load balancer that in fact has two nodes that use the Ultra Monkey package which provides heartbeat (for checking if the other node is still alive) and ldirectord (to split up the requests to the nodes of the MySQL cluster).
In this document I use Debian Sarge for all nodes. Therefore the setup might differ a bit for other distributions. The MySQL version I use in this setup is 5.0.19. If you do not want to use MySQL 5, you can use MySQL 4.1 as well, although I haven't tested it.
This howto is meant as a practical guide; it does not cover the theoretical backgrounds. They are treated in a lot of other documents in the web.
This document comes without warranty of any kind! I want to say that this is not the only way of setting up such a system. There are many ways of achieving this goal but this is the way I take. I do not issue any guarantee that this will work for you!
1 My Servers
I use the following Debian servers that are all in the same network (192.168.0.x in this example):
- sql1.example.com: 192.168.0.101 MySQL cluster node 1
- sql2.example.com: 192.168.0.102 MySQL cluster node 2
- loadb1.example.com: 192.168.0.103 Load Balancer 1 / MySQL cluster management server
- loadb2.example.com: 192.168.0.104 Load Balancer 2
In addition to that we need a virtual IP address : 192.168.0.105. It will be assigned to the MySQL cluster by the load balancer so that applications have a single IP address to access the cluster.
Although we want to have two MySQL cluster nodes in our MySQL cluster, we still need a third node, the MySQL cluster management server, for mainly one reason: if one of the two MySQL cluster nodes fails, and the management server is not running, then the data on the two cluster nodes will become inconsistent ('split brain'). We also need it for configuring the MySQL cluster.
So normally we would need five machines for our setup:
As the MySQL cluster management server does not use many resources, and the system would just sit there doing nothing, we can put our first load balancer on the same machine, which saves us one machine, so we end up with four machines.
2 Set Up The MySQL Cluster Management Server
First we have to download MySQL 5.0.19 (the max version!) and install the cluster management server (ndb_mgmd) and the cluster management client (ndb_mgm - it can be used to monitor what's going on in the cluster). The following steps are carried out on loadb1.example.com (192.168.0.103):
loadb1.example.com:
mkdir /usr/src/mysql-mgm
cd /usr/src/mysql-mgm
wget http://dev.mysql.com/get/Downloads/MySQL-5.0/mysql-max-5.0.19-linux-i686-
glibc23.tar.gz/from/http://www.mirrorservice.org/sites/ftp.mysql.com/
tar xvfz mysql-max-5.0.19-linux-i686-glibc23.tar.gz
cd mysql-max-5.0.19-linux-i686-glibc23
mv bin/ndb_mgm /usr/bin
mv bin/ndb_mgmd /usr/bin
chmod 755 /usr/bin/ndb_mg*
cd /usr/src
rm -rf /usr/src/mysql-mgm


Next, we must create the cluster configuration file, /var/lib/mysql-cluster/config.ini:
loadb1.example.com:
mkdir /var/lib/mysql-cluster
cd /var/lib/mysql-cluster
vi config.ini
Please replace the IP addresses in the file appropriately.
Then we start the cluster management server:

loadb1.example.com:
It makes sense to automatically start the management server at system boot time, so we create a very simple init script and the appropriate startup links:
loadb1.example.com:
echo 'ndb_mgmd -f /var/lib/mysql-cluster/config.ini' > /etc/init.d/ndb_mgmd
chmod 755 /etc/init.d/ndb_mgmd
update-rc.d ndb_mgmd defaults